How to Create Map Series Using ArcGIS Experience Builder

With the retirement of Story Map Series, you might be wondering how to recreate a similar template. Enter ArcGIS Experience Builder: a flexible tool that allows you to design dynamic, interactive pages with ease. By combining pages, buttons and text elements, you can build an engaging experience that seamlessly guides users through your maps and data—just like Map Series, but with even more customization at your fingertips.

In this blog, we’ll demonstrate how to configure two interactive maps with descriptive text in ArcGIS Experience Builder, enhancing both engagement and clarity for your users.

1. Set Up Page 1 (Home Page):

Start by creating a new Experience Builder app. On the home page, create a Sidebar panel and add two Button widgets on the left. Name the first button as ‘Map 1’ and the second button as ‘Map 2.’
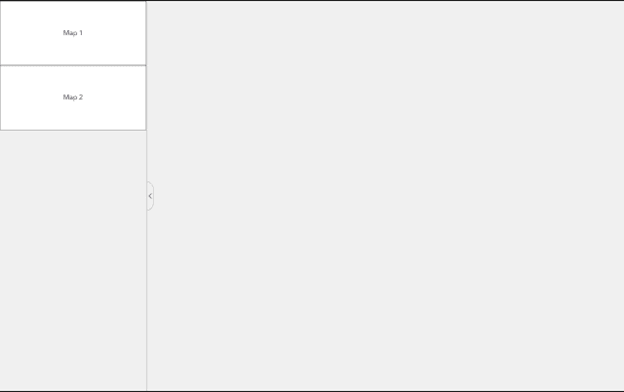
ArcGIS Experience Builder interface showing two button widgets labeled 'Map 1' and 'Map 2' in a left sidebar, separated by a slider from an empty gray area on the right

Creating two buttons for map 1 and map 2 on home page

Click the tab Page on the left, duplicate the home page twice, creating three pages in total. Rename the home page to ‘Page 1.’
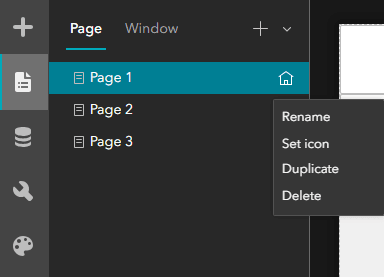
ArcGIS Experience Builder interface showing the 'Page' panel with three pages listed: 'Page 1,' 'Page 2,' and 'Page 3.' 'Page 1' is highlighted in blue and includes a home icon. A context menu is open next to the home icon, displaying options: Rename, Set icon, Duplicate, and Delete.

Creating three pages based on the home page

2. Configure Buttons on Page 1:

In the ‘Map 1’ button configuration, click Set link and link the button to Page 2, select Open in App window.

Repeat this for the second button ‘Map 2,’ and link it to Page 3.
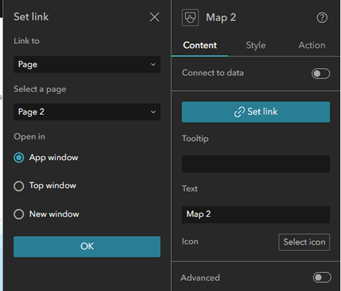
ArcGIS Experience Builder interface showing the 'Map 2' settings panel on the right and the 'Set link' panel on the left, which opens after selecting 'Set link' in the 'Map 2' panel. In the 'Map 2' panel, under the 'Content' tab, options include connecting to data, setting a link, adding tooltip text, custom text (defaulted to 'Map 2'), selecting an icon, etc. In the 'Set link' panel, the user can link to 'Page,' select 'Page 2,' with options to open in 'App window,' 'Top window,' or 'New window.'

Setting the link for the button to Page 2

3. Set Up Page 2:

Go to Page 2, insert your first map on the right side, and add a text between the ‘Map 1’ and ‘Map 2’ buttons to provide a description of the first map.
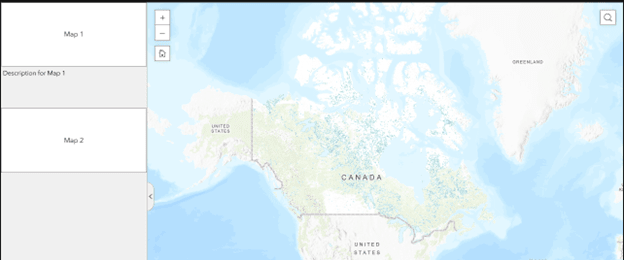
Map interface in Experience Builder displaying an Esri basemap as the first map. The left panel includes buttons labeled 'Map 1,' 'Map 2,' and a description section for 'Map 1’ right beneath the ‘Map 1’ button.

Setting up Page 2 with the first map and its description

Configure the ‘Map1’ button to link to the current page, and the ‘Map 2’ button to link to Page 3. Add a ‘Go Back to Overview Page’ button on the bottom left, linking it to Page 1.
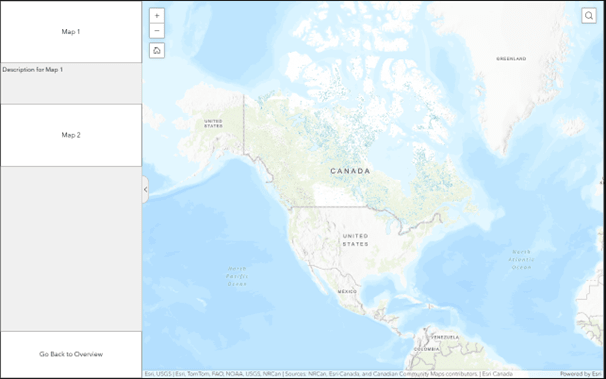
Similar to the last image, there is a map interface in Experience Builder displaying an Esri basemap as the first map. The left panel includes buttons labeled 'Map 1,' 'Map 2,' and a description section for 'Map 1’ right beneath the ‘Map 1’ button. Addition to that, there is a 'Go Back to Overview' button at the bottom of the left panel.

Setting up page 2 and adding the link to the Overview (home) page

4. Set Up Page 3:

Go to Page 3, insert your second map on the right side and add a text box below the ‘Map 2’ button for the map description.

Configure the ‘Map 1’ button to link to Page 2, and the ‘Map 2’ button to link to the current page.

Add a ‘Go Back to Overview Page’ button on the bottom left, linking it to Page 1.
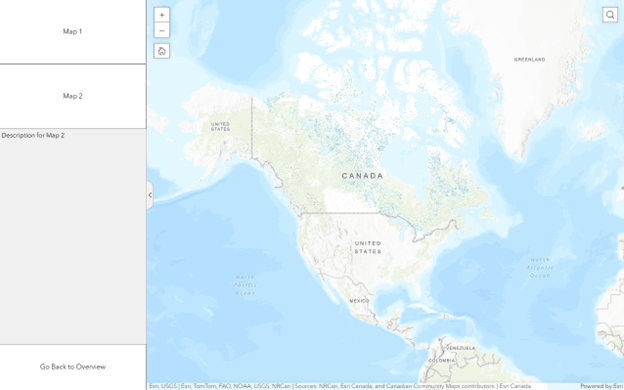
Similar to the last image, this map interface in Experience Builder displays an Esri basemap, now showing the second Map. The left panel includes buttons labeled 'Map 1' and 'Map 2,' with a description section for 'Map 2' located beneath the 'Map 2' button. Additionally, there is a 'Go Back to Overview' button at the bottom of the left panel.

Setting up page 3 and adding the link to the Overview (home) page

5. Final Result:

The video shows the Experience Builder interface with two buttons labeled ‘Map 1’ and ‘Map 2’ on the left-hand side. When ‘Map 1’ is clicked, a map loads on the right side of the screen. Similarly, when ‘Map 2’ is clicked, the content on the right-side updates to display a different map. The interaction highlights the dynamic switching of map views based on user input.

Video demonstrating the result in Experience Builder

More information:

Add and connect widgets in Experience Builder.

Another alternative - Upgrade your classic Map Series binders using the new Portfolio app

A special thank you to Yalan Yang from Tech Support for co-authoring this blog post.  

About the Author

Cocoa Ding is an ArcGIS Support Consultant with expertise in troubleshooting ArcGIS Online apps and enhancing mapping and visualization experiences for customers. Committed to customer service, she provides effective technical support and resolves complex issues to ensure a seamless user experience. Outside of work, she enjoys discovering new movies and exploring culinary experiences.

Profile Photo of Cocoa Ding