Integrating Microsoft Azure Maps layers into your ArcGIS
With the deprecation of Bing Maps imminent, it's time to explore Microsoft Azure Maps. These map layers are the perfect complement to Esri's ready-to-use Basemaps. I’ll demonstrate how to integrate these maps into your ArcGIS Online, ArcGIS Enterprise and ArcGIS Pro workflows to leverage Microsoft Azure geospatial services.
With Azure cloud services already supporting ArcGIS Enterprise through AzureDB, supported deployment patterns, Kubernetes and more – as well as Office 365's integration with ArcGIS, the introduction of Azure Map Layers is yet another example to Microsoft's commitment to advancing geospatial technology.
As you know, Microsoft Bing Maps is soon to be deprecated in 2025. For those of us who leveraged the option to include Bing maps in our web maps, this leaves us in a bit of a bind. The deprecation notices for Bing Maps included an alternative called Azure Maps. Microsoft’s Azure Maps is “next-generation geospatial cloud services and SDKs are constructed specifically for Microsoft Enterprise customers to provide scalable location capabilities and geographically relevant data.” It provides familiar services Bing Maps did with the security, privacy, compliance and scalability of Azure cloud.
The API for Azure Maps enables us to add these maps as tile layers into our web GIS. The old methodology of just providing a Bing Key in the ArcGIS Online organization settings is no longer supported; rather, the layer is added as a Tiled Service with a specifically constructed URL. However, there are a few pre-requisites before we can do this.
Prerequisites
- Ensure you have the appropriate licensing with Microsoft.
- Azure Maps operates on a consumption model which can be found here. However, the terms are likely to be different under a Microsoft Enterprise Agreement and within that agreement the level of subscription you may have.
- Create an Azure Maps Accounts resource in Azure Services
- Sign into your Azure Portal and create an Azure Maps Account
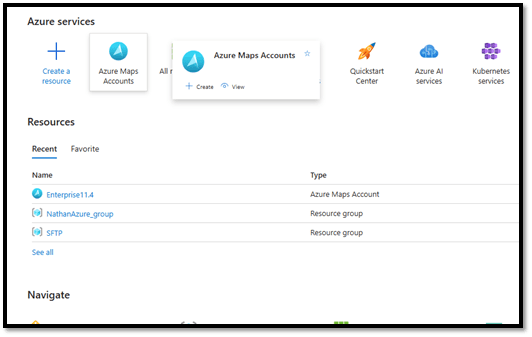
- Sign into your Azure Portal and create an Azure Maps Account
Sign into your Azure Portal and create an Azure Maps Account
-
- Fill in the appropriate Project and Instance details. I am using my Visual Studio Enterprise subscription and selected an existing Resource group. For the Instance details, I gave it a unique name, selected the closest region to me and there’s only one pricing tier available for my subscription.
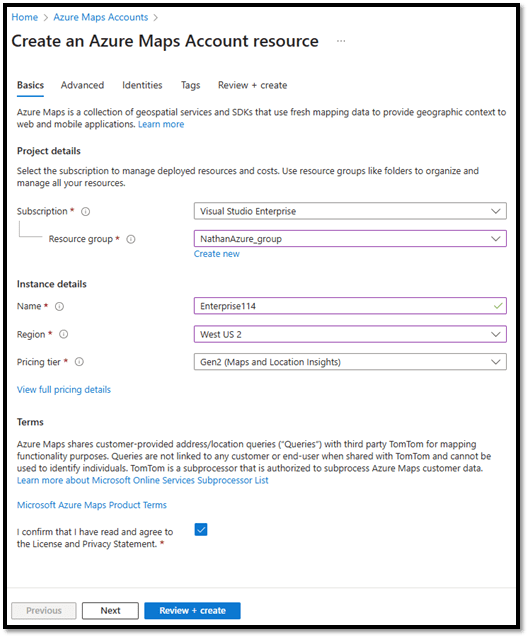
Create an Azure Maps Account Resource
-
Retrieve the Shared Authentication Shared Key
-
Click into the new Azure Maps Account resource and go into Settings à Authentication. A Shared Key Authentication Primary code is automatically generated. This is the token that is used to construct the parameter when adding as a layer to ArcGIS Online or Enterprise.
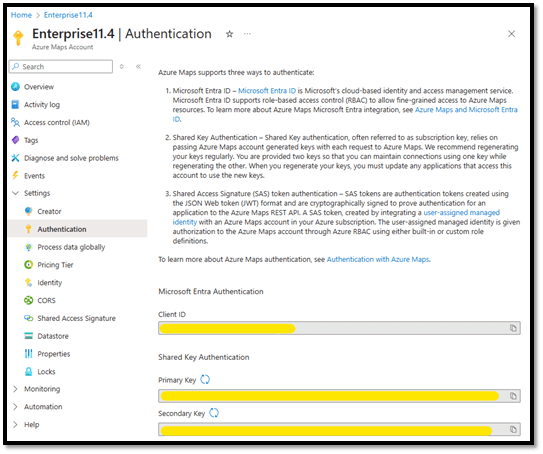
Authentication window for the resource
- Copy the Primary Key into a notepad. You will use the notepad to construct the URL

Copy and Paste the authentication key onto a notepad
-
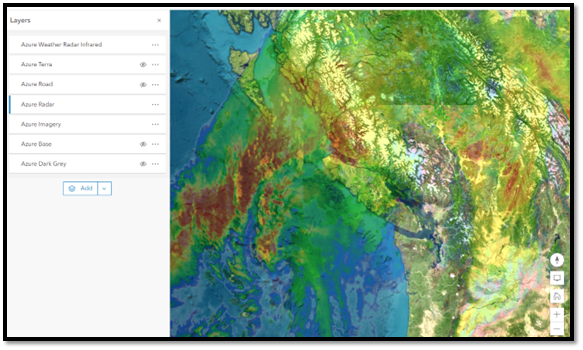
Azure Maps
There are several Azure Map layers that are ready-to-use in ArcGIS Online and ArcGIS Enterprise including:
- Base – roads, boundaries and labels
- Dark Grey – all layers with dark grey style
- Hybrid – roads, boundaries and labels
- Road – all layers in the main style
- Imagery – a combination of satellite and aerial imagery
- Terra – Hillshaded relief
- Weather Radar + IR
I haven’t yet fully explored the full capabilities and available layers in the Azure Maps ecosystem, I’m just interested in some common base maps.
Why would you want to use Azure Maps over the Esri base maps? While Esri base maps are generally considered more comprehensive and focused with wider variety of detailed map layers, there are geographic areas were Azure Maps may offer higher resolution or detail. In the animation below, I’ve added the Azure map layers into ArcGIS Pro and we’re seeing the higher water level and flooding in the Esri World Imagery basemap vs normal levels in the Azure Maps imagery layer. This type of quick visual analyses and inspection contributes to better understanding of impacts of high river flow where there might not be stream gauges, and ultimately to better data-driven decision making and outcomes.
Azure Maps and Esri World Imagery Comparison
In some cases, Azure’s world weather radar tiled services are authoritative whereas Esri does not have a Basemap for weather (There are, however, authorities weather radar services through other agencies).
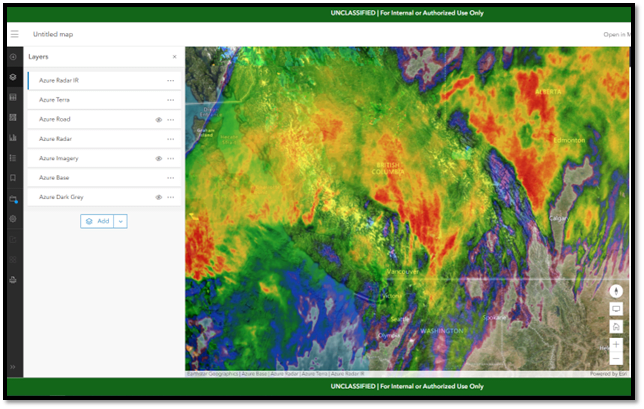
Azure Maps Weather Radar layer
Integrating Azure Maps
Integrating Azure Maps into your ArcGIS web maps is straightforward. The process is similar to adding a tiled layer directly to the web map. To use one of these layers you’ll need to pass in the TilesetID and your Primary Key as shown here:
Remember that key that you copied into notepad? Replace the Xs with you Azure Maps account Primary Key.
For the TilesetID, there are a number of supported tiles:
|
TilesetID |
Type |
Description |
|
microsoft.base |
string |
A base map is a standard map that displays roads, natural and artificial features along with the labels for those features in a vector tile. Supports zoom levels 0 through 22. Format: vector (pbf). |
|
microsoft.base.darkgrey |
string |
All layers with our dark grey style. Supports zoom levels 0 through 18. Format: raster (png). |
|
microsoft.base.hybrid |
string |
Displays road, boundary and label data in a vector tile. |
|
microsoft.base.hybrid.road |
string |
Road, boundary and label data in our main style. |
|
microsoft.base.labels |
string |
Displays labels for roads, natural and artificial features in a vector tile. |
|
microsoft.base.labels.road |
string |
Label data in our main style. |
|
microsoft.base.road |
string |
All layers with our main style. |
|
microsoft.imagery |
string |
A combination of satellite and aerial imagery. Only available in S1 pricing SKU. |
|
microsoft.terra.main |
string |
Shaded relief and terra layers. |
|
microsoft.weather.infrared.main |
string |
Weather infrared tiles. Latest Infrared Satellite images shows clouds by their temperature. Please see-coverage information-for Azure Maps Weather service. To learn more about the returned Satellite data, please see-Weather concepts. |
|
microsoft.weather.radar.main |
string |
Weather radar tiles. Latest weather radar images including areas of rain, snow, ice and mixed conditions. Please see-coverage information-for Azure Maps Weather service. To learn more about the Radar data, please see-Weather concepts. |
The constructed URL can now be added to the web map. Note, that it is easier to construct the URL in a notepad than it is in the Add Layer window within ArcGIS Online.
- Copy the URL in notepad

In notepad, paste the URL for the tile layer service, modifying the tilesetID and the subscription-key - In your web map, go to Add layer from URL
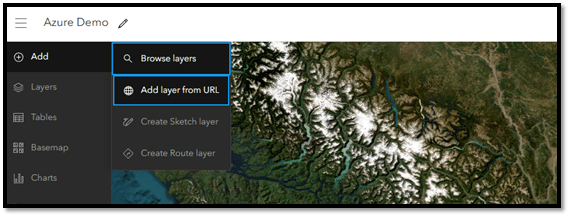
Add layer from URL - Paste the URL from notepad into the Add Layer window, selecting the Type as Tile Layer, Click Next
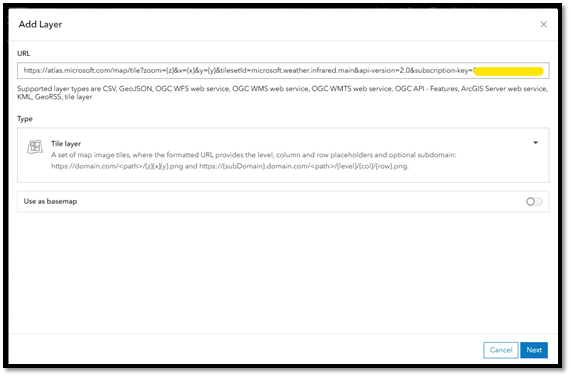
Paste URL from notepad into the URL window - Give your Tile Layer a Title and Attribution, Click Add to Map
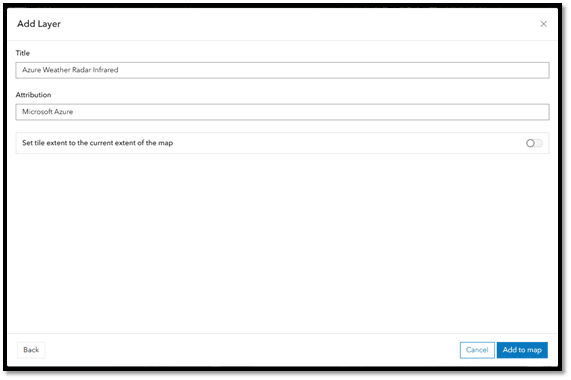
Add Title and Attribution - Now you’ve got a layer from Microsoft’s Azure Maps service into your ArcGIS web map
Azure Maps Weather Service layer in ArcGIS Online
Integrating Azure map layers into your ArcGIS web maps alongside Esri basemaps is just the beginning of what you can achieve with Azure. With Esri's growing relationship with Microsoft and the robust capabilities of Azure cloud services, the potential for innovative mapping solutions is immense. Many Microsoft products, such as Power BI, Microsoft 365 and Dynamics 365, are already seamlessly integrated with ArcGIS. Additionally, ArcGIS Enterprise can be implemented in Azure cloud services and Kubernetes, providing scalable and flexible deployment options. Looking ahead, the future of ArcGIS within Microsoft Fabric promises even more powerful and integrated geospatial solutions, paving the way for advanced analytics and data-driven decision-making.