NG9-1-1 Data Manager Part 1: Add Address Points & Rename Roads
NG9-11 Data Manager 2.4 is here—bringing faster workflows, smarter tools and practical upgrades to keep your data accurate and NENA- compliant.
Introducing NG9-1-1 Data Manager
If you are looking for a solution that can assist your organization prepare your NG9-1-1 GIS data in alignment with the NENA GIS Data model, look no further! NG9 -1-1 Data Manager is a configurable web solution designed to assist communities in maintaining their NG9-1-1 compliant GIS datasets. This includes civic addresses, street centrelines and service boundaries (Fire, EMS, Police, and others).
NG9-1-1 Data Manager uses a data model that is in alignment with the NENA NG9-1-1 GIS data model. However, the solutions data model is extensible, meaning that if you have fields or featuretypes that your organization requires, these can be maintained as well. NG9-1-1 Data Manager has built-in quality checks which prevent errors like duplicate addresses, minimum street name elements, incorrect address ranges and service boundary overlaps.
During the Esri Canada User Conference in November we announced that Address Manager has been rebranded as NG9-1-1 Data Manager. As of November 28th, 2025, this change has become official with the release of NG9-1-1 Data Manager 2.4. Now just to clear the air, this is a name change only. The product you know and trust remains the same. For more information on NG9-1-1 Data Manager, the solutions resource page can be found here. The resource site includes helpful tutorial videos along with the solutions help guides.
In this two-part blog series, we are going to take on the role as a GIS staff member who needs to leverage some of the new functionality in NG9-1-1 Data Manager to create new Address Points and rename a road. In part two, we will go over how we can then submit this data to our NG9-1-1 Aggregator and resolve any discrepancies that are found in our datasets.
Addressing Points by Road
A new tool to the NG9-1-1 Data Manager toolbox is Add Address Points by Road. This tool uses the selected road centreline to assign the road name to newly placed address points.
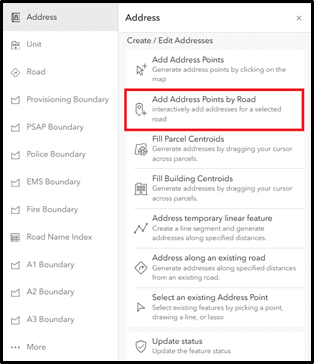
Add Address Points by Road tool in the Address Toolbox.
After selecting the Add Address Points by Road tool, you would next select the road segment the address points will be associated with and then choose your snapping parameter (the default is parcel centroid).
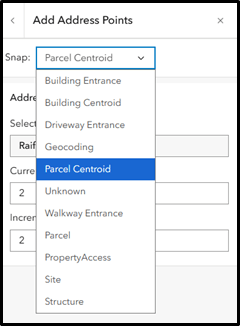
Snap parameter options available in NG9-1-1 Data Manager
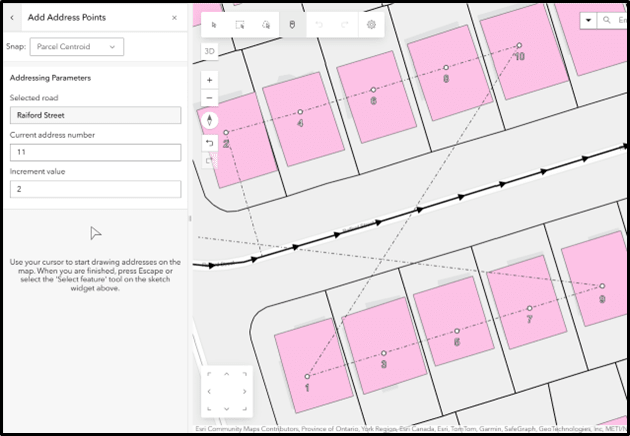
After selecting your snap setting, in the Current address number box you will enter the number of your first address point.
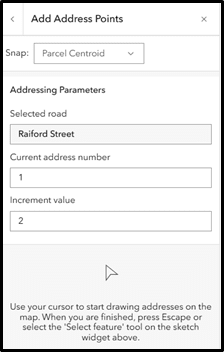
Add Address Points by Road tool dialogue
Next, in the Increment value text box you can enter the value the address points will increase or decrease by. For example, if the address points that are being created on the even side of the road start at two, enter the value two in the current address number field. If those address points increase by two as well, enter the value two in the increment value field. From here, you can start placing address points and the current address number will increase by the increment value specified.
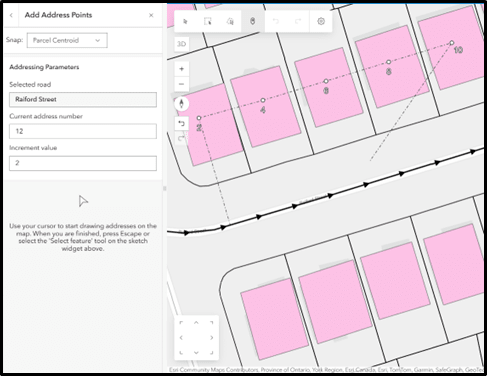
Placing even numbered address points using the Add Address Points by Road tool
Once you have finished adding address points on the even side of the road segment, you can seamlessly switch to addressing points on the odd side of the road by entering an odd value in the current address number box. For example, if the right side of the road segment has odd address points that begin at one, you can enter one in the current address number box and update the increment value if it has changed.
Placing odd numbered address points using the Add Address Points by Road tool
Once you have finished placing your address points, you can then finish editing the attributes of each address point and save them. Using the Add Address Points by Road tool is just one of the few ways you can create new address points in NG9-1-1 Data Manager. For more information on this tool, check out the help page here.
Rename Road Tool
If road segments require a name change these can be easily handled using the Rename Road Tool.
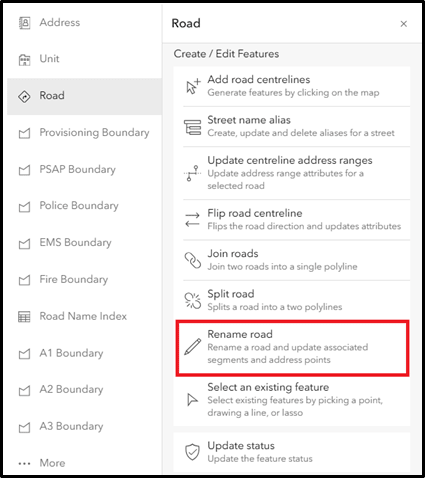
Rename Road tool in the Road Toolbox tool
To start using this tool, first you can select the road segment that you want to change. The road segment and all address points associated with it will become highlighted as seen in the screenshot below:
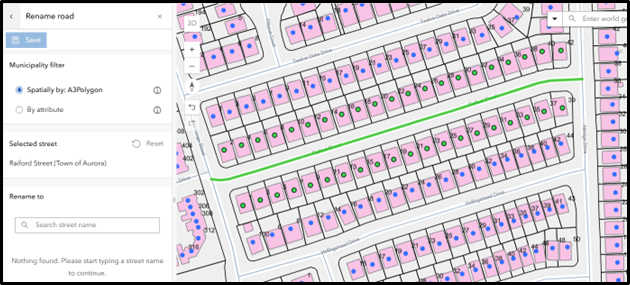
Rename Road tool interface
By keeping the default option Spatially by: A3 Polygon it means that the tool will look for road segments that are located within the A3 (Municipal) boundary. Moreover, the name of the municipality is taken from the A3 polygon to find all address points with the matching road and municipality name. In the Rename to box you can type in the road name you wish to rename the current road segment to. In the screenshot below we renamed Raiford Street to Closs Square. You will see that all road segments with the current name will be listed under Road centrelines and all associated address points will be listed as well. You can then save the new road name.

Rename Tool interface after choosing a renamed road name
And just like that, you have now successfully renamed Raiford Street Closs Square! The rename road tool is just one of the new additions to NG9-1-1 Data Manager. You can find more information on the rename Road tool in the help documentation here.
Conclusion
Add Address Points by Road and Rename Road are just some of the tools available to help manage your NG9-1-1 datasets. In part two of this blog series, we will go over the workflow on how to submit your data to your NG9-1-1 Aggregator and then resolve any discrepancies that might be found in your data.