Tips on updating your ArcGIS Enterprise organization URL
Your organization rebranded, and now you’re staring down the challenge of updating all your ArcGIS Enterprise URLs. Impossible, right? Not anymore. ArcGIS Enterprise 11.5 introduces full support for updating domains, subdomains and contexts. Let’s talk about how game-changing that is!
The company that you work for has recently changed its name, and you've been tasked with changing all the URLs for your organization's ArcGIS Enterprise environment.
You may wonder, how do I do this? You know that when you first installed ArcGIS Enterprise, the organization's URL was predetermined. What are you going to do?
Here's the good news, starting ArcGIS Enterprise 11.5, updating the domain, subdomain, context or any combination of these URL components is supported.
Insert happy dance!
Before we dive in
Before you take the plunge, consider first: Have you installed the Portal for ArcGIS 11.5 Web Applications Patch? This patch is critical because it ensures your web applications stay stable and fully compatible with the new URL update functionality.

Portal for ArcGIS 11.5 Web Applications Patch as seen in the Patch Notification tool
Pro Tip - Before installing patches, Esri recommends creating a rollback plan to keep your environment safe and flexible. This could mean taking snapshots of machines and related file servers or using the WebGIS DR tool for a reliable software backup. Want to learn more? Check out Back up and restore best practices for more information.
Questions to consider
The patch is installed and we’re almost ready to roll. But before we dive in, let’s tackle a few important questions:
- Does your organization work with offline data?
- Does your organization have offline web maps?
- Will you be changing the name of the web adaptor?
- Does your organization use a reverse proxy server?
If you answered "yes" to any of these questions, please see the section Prepare Your Organization in the following documentation.
Setting the WebContextURL in Portal for ArcGIS and ArcGIS Server
If you haven’t already done this, set up the WebContextURL property for your portal to the existing URL.
Note: this will need to be completed for each of your federated servers.
Steps for Portal for ArcGIS
Step 1
Open a web browser and sign in to the Portal Administrator Directory as a member of the default “Administrator” role in your organization.
- The URL is formatted https://organization.example-domain.com:7443/arcgis/portaladmin.
Step 2
Click System > Properties > Update Properties.Step 3
On the Update System Properties dialog box, insert the following JSON, substituting your own reverse proxy server or DNS alias URL as seen by users outside your organization's firewall:
"WebContextURL": "https://dnsalias.example-domain.com/portal"{}
Step 4
Click Update Properties.
As demonstrated in this documentation.
Steps for ArcGIS Server
Step 1
Log in to the ArcGIS Server Administrator Directory at https://gisserver.domain.com:6443/arcgis/admin as a user with administrator privileges.
Step 2
Click System > Properties > Update.
Step 3
In the Properties text box, insert the following JSON, substituting your own ArcGIS Server URL as seen by users outside your organization's firewall:
{ "WebContextURL": "https://gisserver.domain.com/mygis"}
Step 4
Click Update.
Step 5
Restart ArcGIS Server on each GIS server in the site. On Windows, this can be accomplished by restarting the ArcGIS Server Windows service on each machine.
See this documentation for a demonstration.
Updating the ArcGIS Enterprise Organization URL
Alright, we did it! Every step is complete, and now the moment you’ve been waiting for—time to update that organization URL. Yes, really. Let’s make it happen!
Step 1
Sign in to the Portal Directory through port 7443 as a default administrator.
The URL is in the format https://organization.example.com:7443/arcgis/sharing/rest.
Note: If the primary site administrator account has been disabled, you can re-enable the account using the password reset utility.
Step 2
Click Home > Portals > Self.
Step 3
At the bottom of the Self resource page, click URLs.
Child Resources as seen at the bottom of the pageStep 4
Click Generate Organization URL Map > Generate Map and do the following:
Step 5
Verify that an ID was provided for each of your federated servers and that there are no errors.
- If there is an error with a federated server, the server machine is off or unavailable. Do not continue with this workflow until you address the error or remove the server.
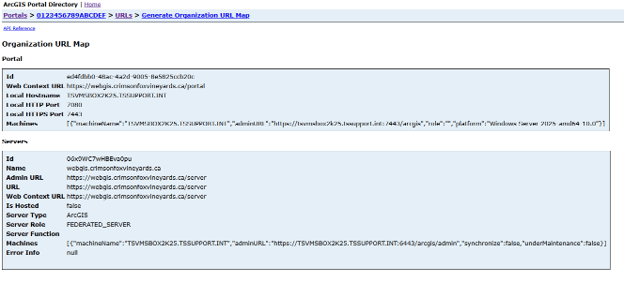
Organization Url Map as seen from the Poral directory
Step 6
Copy the ID of the first listed server.
Step 7
Optionally, review the items that will be impacted when updating the server URL by doing the following:
- Return to the URLs page and click Generate URL Report.
- Provide the ID in the Server Id text box. Eg: 06x9WC7wHBEva0pu
Step 8
Click Generate Report.
- Review and save the output of the report.
{ "jobId": "81238da529584721afeadeabf4c8f012", "key": "rDVTOHaRm0eFtc5kGstUb4UfSfSWYvojIHbY1ZAQGBE", "jobUrl": "https://webgis.crimsonfoxvineyards.ca/portal/sharing/rest/portals/self/jobs/81238da529584721afeadeabf4c8f012"}Step 9
Return to the URLs page, click Update Federated Server URL, and do the following:
- Provide the ID in the Server Id text box.
- Provide the server URL.
The URL should be in the format https://new.organization.com/server.
- Click Update URL.
- Click the jobs id hyperlink and verify that the status is complete before moving to the next step.
- Provide the server URL.
Well done—you made it! Take a moment to soak in the satisfaction of completing the blog without a single hiccup. Now treat yourself to that fancy coffee—you’ve earned it!