How to Add the Community Map of Canada Basemap in Leaflet
The Community Map of Canada (CMoC) is a frequently updated vector tile basemap built from authoritative data from Canadian communities. The free basemaps are used extensively in ArcGIS Pro, ArcGIS Online and ArcGIS Enterprise, but did you know it’s also possible to use the Community Map of Canada basemaps in Leaflet? Follow this guide to learn how!
If you’ve been involved in web GIS development, you’ve likely heard of Leaflet. Leaflet is an open-source JavaScript library used to create web maps. The foundation of any web map is a basemap that contextualizes the data’s surrounding location and it’s important that this basemap is up-to-date and accurate. The Community Map of Canada basemaps provide authoritative and reliable information and can be added to Leaflet web maps by following the steps below. Interactive samples will be referenced throughout this tutorial, and they can be accessed in the CodePen links below for your own testing!
- Basic example of the Community Map of Canada basemap in Leaflet
- Adding additional layers and controls to the example above
Requirements
- Beginner experience with HTML, JavaScript and Leaflet, or a keen interest to learn!
- If you aren’t familiar with Esri Leaflet, detailed documentation is available here.
- (Optional) An ArcGIS Developer or ArcGIS Online account with an API Key. This is recommended to gain access to other useful functionalities of Esri Leaflet. To get your free API key, follow these steps.
Initializing Leaflet and Additional Plug-ins
To follow along with this tutorial, open the first code sample on CodePen.
The HTML head contains the references to the required libraries, specifically Leaflet, Esri Leaflet and Esri Leaflet Vector. Esri Leaflet is an open-source plug-in for Leaflet that allows you to easily create layers from ArcGIS Online or ArcGIS Enterprise web services. Esri Leaflet Vector adds to Esri Leaflet’s functionality to access vector tile layers from ArcGIS Online.

In the HTML body, the Leaflet map is displayed in the #map div element using the L.map function. Some basic settings are included like the initial view extent and zoom level.

Understanding Multi-layer Vector Basemaps
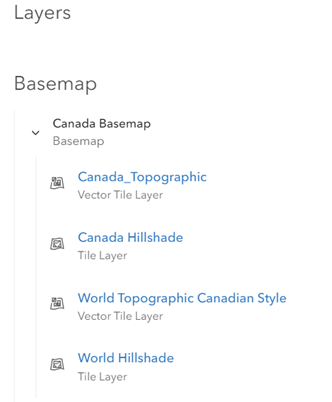
Before we add the Canadian Topographic basemap to the Leaflet map, let’s first discuss the layered design of the basemap. In the Community Map of Canada style gallery, open the “Topographic / Topographie” item.
The Canadian Topographic basemap is comprised of 4 different layers (as seen if you scroll down to the layers list). This is a common design for basemaps where multiple sources of topographic information are combined into a unified basemap. This can be particularly powerful when a basemap already exists and you want to add more information to it, such as the Canadian Topographic map which adds more details to the existing World Topographic and Hillshade basemaps. Every CMoC basemap follows this model.
Layer Ordering and Leaflet Map Panes
To display The Canadian Topographic basemap correctly, these four layers need to appear in the correct order.
If you’re familiar with Esri Leaflet Vector, you may think of using the vector basemap layer class. However, vector basemap layer was designed to work with single-layer basemaps, but multi-layered basemaps may have their layers displayed in the wrong order, such as the Canadian Topographic basemap. So how do we solve this challenge?
Before solving that problem, we first need to understand how Leaflet map panes work. In Leaflet, map panes are used to group layers together and stack them in a certain order (using the zIndex CSS property). Leaflet has some built-in panes with pre-defined ordering, but developers have the option of creating their own custom-ordered panes too.
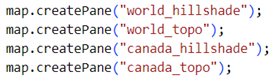
Instead of using vector basemap layer, the Canadian Topographic basemap requires custom map panes for custom ordering of the layers.
Although the order of this code seems reversed, JavaScript executes from top to bottom.
Adding the Basemap Layers
Now that we’re correctly controlling the order of our layers with custom panes, the Canadian Topographic layers can be initialized starting with the hillshades. In the code below, the L.esri.tiledMapLayer class is used to call the World Hillshade and Canada Hillshade service URLs.
Within the parameters, these layers are assigned to their respective hillshade map panes.
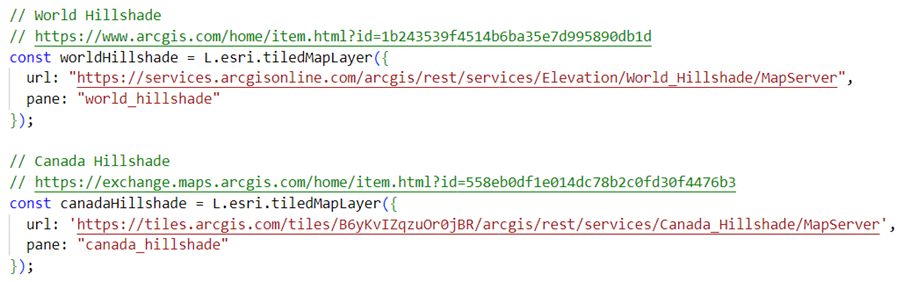
The hillshade layers need to be called with the tiledMapLayer class and assigned to separate map panes.
Next, the L.esri.vectorTileLayer class accesses the World Topographic Canadian Style and Canadian Topographic layers and assigns them to their corresponding map panes. Note the different syntax between tiledMapLayer and vectorTileLayer.
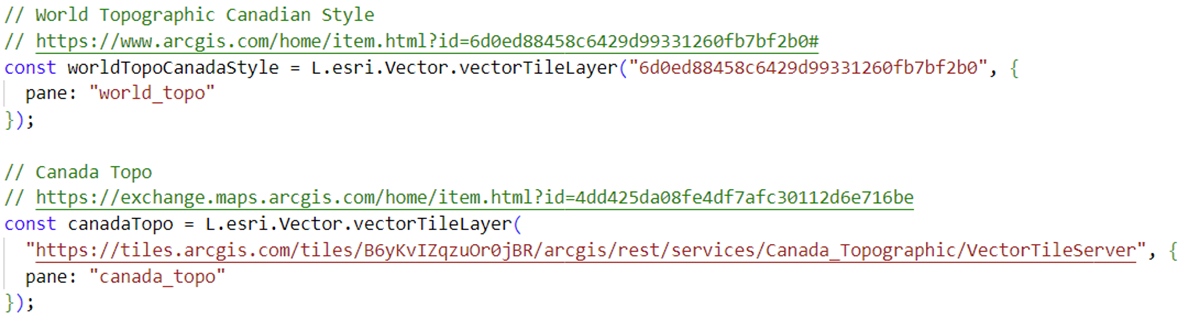
For the World Topographic Canadian Style, notice that we’re referencing the ArcGIS Online item ID instead of the vector tile service URL. To use the custom styling of a vector tile layer, you must reference the item ID, otherwise Leaflet will use the style of the original vector tile layer. The World Topographic Canadian Style layer is a customized styling of the World Topographic basemap.
Learn more about how you can create custom styles using the Vector Tile Style Editor in this blog and try it here.
Creating a Basemap out of the Layers
Without grouping the vector tiles and hillshades together, Leaflet will interpret them as separate layers rather than a singular basemap. We can group the layers together using L.layerGroup.

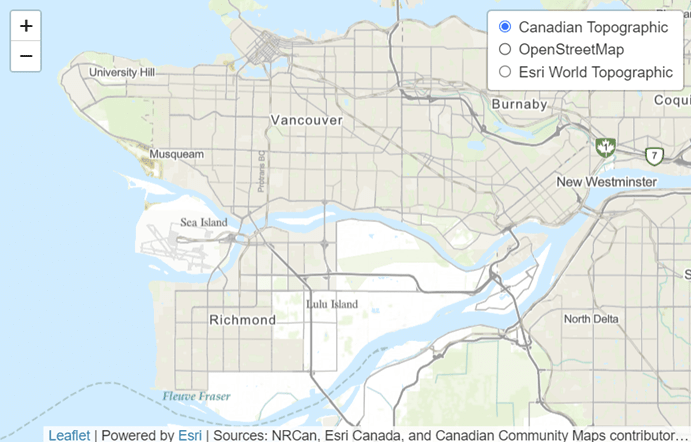
The Canadian Topographic basemap is now displaying in our Leaflet web map! To add other layers to the Leaflet map, the layers must be assigned to a new map pane to stay above the basemap. On line 70 of the example, a new “overlay_layers” pane is created, and a feature layer (for Metro Vancouver administrative boundaries) is assigned to the pane.
Optionally, continue to the next section to learn how to add the Community Map of Canada basemaps to the Leaflet layer controls.
(Optional) Add the Basemap to Leaflet Layer Controls
As mentioned earlier, you may want additional basemap options on top of the Canadian Topographic. For example, we can add the Esri World Topographic and OpenStreetMap basemaps as additional options. This section’s sample code can be found in the second CodePen, and refer to lines 51-90 in the JavaScript code.
To get the full experience of this section, you’ll need an API key to access the vector basemap style service. Refer to this documentation to learn how to get your API key. Once you have an API key, edit the JavaScript code to (1) replace the string in line 5 with your key, and (2) uncomment lines 62-67.
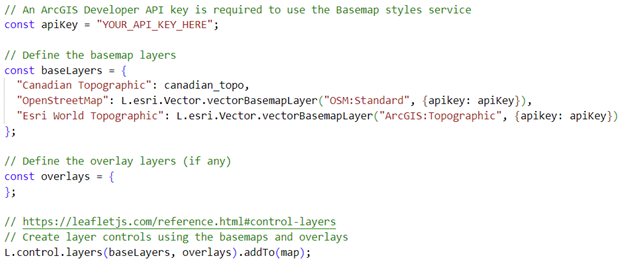
The Leaflet layer controls will now appear on your web map with the different basemap options!